Wednesday, December 4, 2013

3RD Marking Period

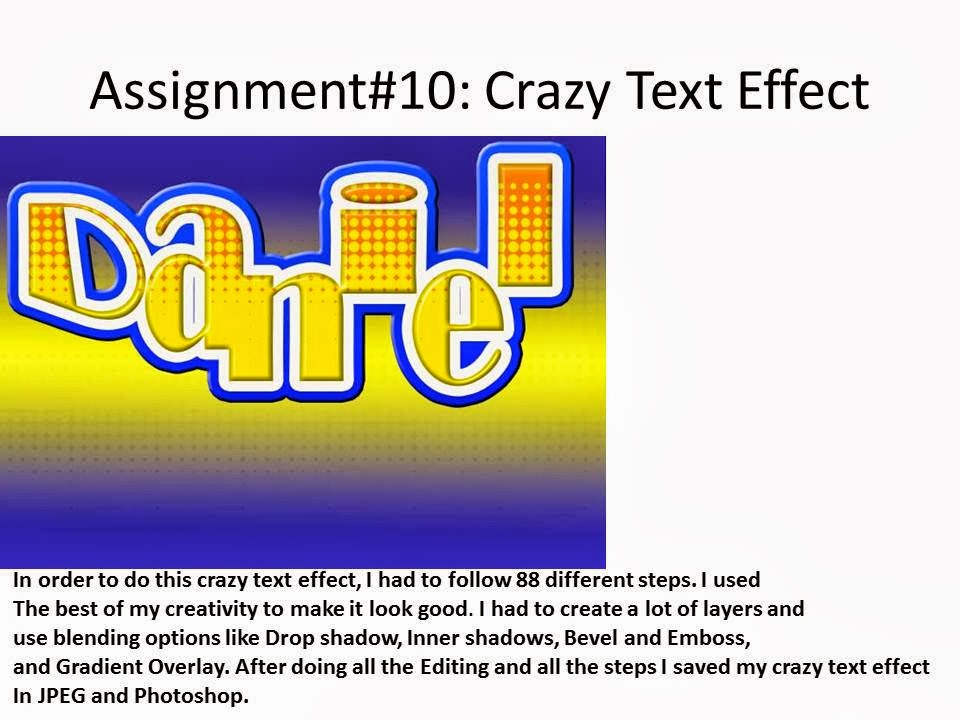
Assignment#21 a.b.c.--> Getting to know the basics
In order to do this project I had to use sketchup, use the circle, line and rectangle tools to make the letters for my name. Then i push the letters back with the push/pull tool to give it a 3-D appearance.
*******************************************************************************

Assignment#22 Block 1.
8x5x5


********************************************************************************
Assignment#22 Block 2.
8x5x5

*********************************************************************************
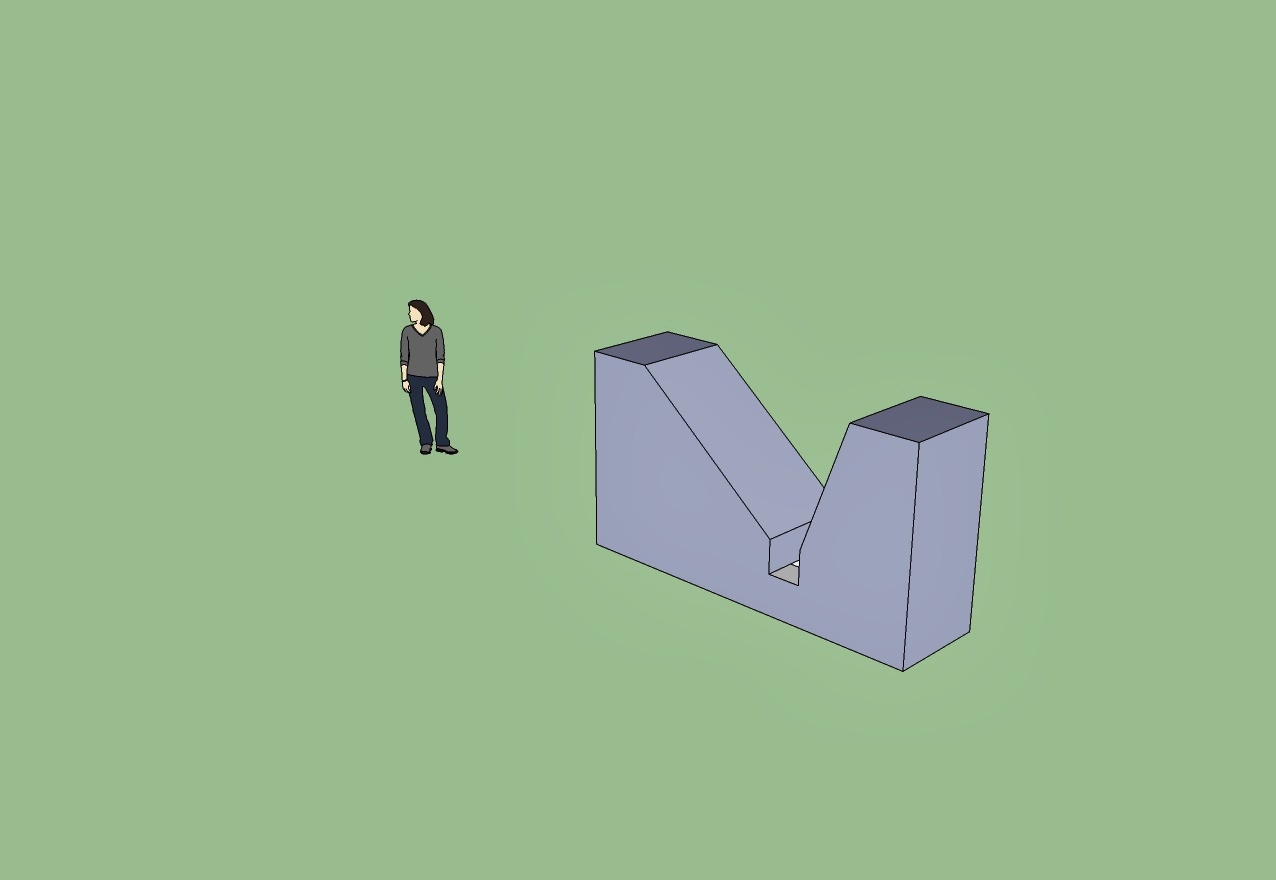
Assignment#22 Block 3.
7x6x2

*********************************************************************************
Assignment#22 Block 4.
8x2x6

***********************************************************************
Assignment#22 Block 5.
8x5x5

********************************************************************************
Assignment#22 Block 6.
8x6x5

**************************************************************************
Assignment#22 Block 7.
8x6x5

******************************************************************************
Assignment#22 Block 8
9x6x5

********************************************************************************
Assignment#22 Block 9.
9x6x4

***************************************************************************
Assignment#22 Block 10.
11x6x3

****************************************************************************
Assignment#22 Block 11.
8x6x5

*****************************************************************************
Assignment#22 Block 12.
9x6x4

In order to do these 12 Blocks I used a very easy technique. I counted the number of boxes in every side of each Block and did the correct measurements in sketch up. 
***************************************************************************
QUIZ:
L=8
W=5
Z= 6

*****************************************************************************
Assignment#23: Ginger Bread house

In order to do this project I had to create a rectangular base for my house, then I created a triangle for the top of my house. I got a picture from Google of a gingerbread house and I tried to make mines as similar as possible to it. I used the circle tool to create all the circles around the house. I decorated it as much as I could so that it would look colorful and much like the picture I got. 
******************************************************************************
Assignment#24: Ginger Bread house 3D

In order to make my house look 3-D I had to send it to Photoshop and went to the blending options and separated the channels to red and blue so that it could be seen with the 3-D glasses.
*******************************************************************************
Assignment# 25: Animation Button

In order to do this project ' Animation Button' I had to use Photoshop. I had to use gradient overlay and other styles in blending options like inner glow, outer glow and inner shadow. The last part of the button was creating the animation. Although is not as hard, you should follow the steps carefully. I had to duplicate the frames so that I would have 14 in total. Then I reversed them and tested it. My animation was done and correct. 

QUESTIONS: 
1. GIF is a loss-less format for compressing image files. Stands for Graphic Interchange Format.
2. Animation gives life to an image. It presents small differences of an image in a steady progression, giving the person looking at it a notion that it is moving.
******************************************************************************
Assignment#26: Test 

In order to do this test i had to use Photoshop. I had to first create different rectangles and give the page a 
3-D appearance of a room. Then i had to use the ellipse tool and create 1 small oval which later I duplicated to three. After that i created a smaller oval inside of the previous. The step that followed was creating lights. I used the "Elliptical Marquee tool"  to make a selection on the "floor" layer. Then I filter> blur>Gaussian blur 10 pixels and gave it 40% opacity. I used the same tool again to make another oval but on the "middle" layer, followed the same steps but applied 25 pixels and 80% opacity.  Finally i got three objects that interested me the most and placed them under the lights previously created.
*********************************************************************************
Assignment#27: Making a brochure with publisher


1.Post the room ( you can download from the email you sent me). Explain how you ear your first possible 100 points. 

2. Some of the problems I encountered was creating the layers for the lights. I asked Ms.Wang what did I have to and it i just had to simply create a new layer and duplicate it.


1


Friday, October 18, 2013

2nd Marking Period

11: Flyer Redesign

 First  I used gradient for the background. Then I searched for pictures related to science and pasted them. Lastly I used  Plastic to create the tittle Noche De Ciencias
***************************************************************
12:  Texture With Layer Mode
In order to do this project I had to get a picture of a suit/ jacket from Google. I had to choose a texture and  place the texture over the top of the jacket and make that it covered it. Lastly this being a short project I had to  lower the texture layers opacity to complete the effect.
************************************************************************
13: Change One Thing Poster


 ********************************************************************
14: Halloween Project on Photoshop with an Extra credit on Illustrator

In order to do this Project I first had to set the back ground Black. Then I had to fill the background with a radial brown to black gradient. After that i got a picture of a pumpkin from Google and started editing it by using  the Lasso Tool.  After that I created a new layer and named it "fill", there i sketched a face on the pumpkin. Then I edited it, using Gradient overlay, inner shadow, stroke etc. Lastly I wrote " Toribio's Jack-o- Lantern" and i was done.
**********************************************************************************************************************************15: Flag displacement


In order to do this project I had to search for a brick wall then place it as my background. Then I chose the flag of the Dominican Republic because that's where I am from and started editing it.I had to Select the UK Flag Layer and change the blending mode to Hard Light. Select the Brick Layer and hit CTRL+J to duplicate the layer.  Lastly i had to Set the Opacity to 80% just to give the layer a more natural look.
*******************************************************************************************************************************
15b: Selfie Face Displacement
In order to do this project I had to choose a selfie that I had and post it in a new page on Photoshop and start editing it. I had to put the flag that I had chosen to displace on my last project and do the same steps on It but on my face. By the end of this project I had the Dominican Republic flag placed on my face.
************************************************************************
16: Motion blurred via smart filter
I did this project by first obtaining a picture of a train in Google. After I did that i placed it as my background picture and opened it as an "smart object". My next step was to use filter, and blur my picture with 25px of motion blur in my case. Then i used the brush tool to paint over the train. My last step was to put the original picture on the top and see the difference. 
*****************************************************************************
17. Masking an area for changing eye color
I did this project by first obtaining a picture of a person which I could edit in this case I chose Jennifer Lopez.  Then I clicked on the quick mask button  and edited my picture using the brush tool, master diameter slider. 
***************************************************************************
18. Soft focus effect

In order to do this assignment I had to first get a picture of anyone in Google, in this case I chose Jennifer Lopez. I had to use smart filters and blur the picture with Gaussian blur. Then i had to use the radius slider and brush tool to edit the eyes of Jennifer Lopez. 
******************************************************************************
19. USB Flash Drive

In order to do this project I had to follow a lot of different steps. I started off by doing  a rectangle in the middle of the page, then do an ellipse that would be the bottom of my rectangle. After that I had to use gradient and apply it on a variety of different ways. I had to deal with a  lot of different percentages on different slides. After that I had to create the top of my USB using the rectangle tool with the measures of 158 x 12 px and 118 x 8 px. The following step was to create 3 squares with the lengths of 100 x 100,
 97 x 97 and 94 x 94, these would make up the connecting part of my USB. After this I had to create two rectangles 25 x 14 px to give my USB the actual look of one. The next and final step was to create a rectangle with the measures of 80 x 165 px in which i wrote "Daniels Flash Drive" and "16GB" to finish my USB project.
*********************************************************************************
20. Wireless phone 
In order to do this project i had to follow a series of 32 steps which I will put into my own words in this summary. I had to create the shape of my phone which was a rectangle with the measures of 147 px by 440 px. I had to apply a lot of different gradients to a lot of different shapes that i created using the " Rectangle tool" and "Ellipse tool". This project took a lot of time to do because, combined there were over 30 different shapes that had to be done to give the wireless phone its right appearance.